Monday, 18 January 2010

A Mixed Bag

Have been massively busy due to starting a new part-time job and the fact that our house appears to be falling apart- luckily hasn't effected my craft room!

Have made a really mixed collection of cards today.  The first is this one using one of my new stamp sets "Simply Said".  I made this to take to home workshops to show customers some of the items that can be made using the hostess goodies that they could earn if they held their own workshop.


I used the Night Of Navy DSP from the patterns lll pack, this is a level 1 hostess reward.  I used a Whisper White card base and layered the DSP onto some Night Of Navy card stock before attaching it to the card base.  I then cut a smaller rectangular piece of Night Of Navy and Whisper White card stock, using the large flower stamp from the Simply Said set and Night of Navy ink stamped the image on the whisper white and attached it to the front of the card. I took a scrap piece of the DSP and punched out 2 of the flowers from the Boho Blossoms punch.

I turned the larger flower over to show the darker pattern on the reverse of the paper and layered the smaller flower on top. I then used the paper piercer and mat pack to make button-like holes in the center of the small flower and using a small piece of the silver elastic cord, i threaded the cord through and tied a knot joining the 2 flowers together.  You can use adhesive but I found that the cord works effectively, also the cord allows the flowers to stand out more and look more 3D.  I adhered the flower using a dimensional.  I debated using the silver cord to tie a bow around the spine of the card too but decided that I liked this design better. To finish it off I stamped one of the sentiments from the Simply Said stamp set in night of navy inside the card.

Recipe:

card stock/papers- whisper white, night of navy. night of navy dsp
ink- night of navy
punches- boho blossoms
accessories- silver elastic cord
equipment- paper piercing tool, mat pack, dimensional, trimmer, paper snips, snail adhesive


The second card is very simple and quick to make.


I made a Rose Red card blank. Cut a piece of So Saffron and used the scallop edge punch on the bottom. I then used the scallop circle and 1 3/8" circle punches  on some Rose Red and Very Vanilla card stock. I layered them then, using the Stamp-A-Ma-Jig and taking 2 of the stamps from Circle Circus, I used So Saffron and Rose Red ink to stamp onto the very vanilla card stock.  Just to highlight how useful the stamp-a-ma-jig is, I didn't use it on the first circle which came out very wonky, but I did use it on the other two. I attached the 3 circles to the So Saffron card stock and the card was done!

Recipe:

Card stock- Rose Red, Very Vanilla, So Saffron
Ink- Rose Red, So Saffron
Punches- scallop edge, scallop circle, 1 3/8" circle
Equipment- trimmer, snail adhesive

Will post more pics tomorrow as unfortunately the camera battery has just died!

Take care
H x

Tuesday, 12 January 2010

Oh dear

Ok so the link didn't work!

the Inspiring Inkin' Challenge Blog can be found at:
http://inspiringinkinchallenges.blogspot.com/

Go have a look!

Helen x

Inspring Inkin' Blog Challenge No.18

This is my first Inspiring Inkin' Challenge entry I hope you like it! This weeks challenge was to use the chalkboard technique.  The Inspiring Inkin' blog can be found here


Recipe

Card- Rose Red, Whisper White, Basic Black
Stamps- Circle Circus, Whimsical Words (Sale-A-Bration set)
Ink- Whisper White, Stampin' Pastels (Rose Red,Certainly Celery, Yoyo Yellow, Ballet Blue and Taken With Teal)
Punches- scallop circle and 1 3/8" circle punch
Equipment- Paper trimmer, sponge daubers, dimensional

I made a card base using rose red cardstock, then cut a piece of basic black slightly smaller than the base.  Using whisper white ink and the circle circus stamp set I stamped a mixture of different circles onto the black card then used the sponge daubers to pounce the Stampin' Pastels onto the ink.

To finish it off I used rose red ink and the 'you're too kind' sentiment fro the Sale-A-Bration set Whimsical Words to stamp a sentiment on some whisper white cardstock before puching it out using one of our circle punches. I then punched a scalloped circle from rose red cardstock and attached the sentiment before attaching to the card using a dimensional.

Hope you like it!

helen x

A First Attempt

This is just a quickie.  This idea was CASED from a card that Amanda showed me during training in November.  My Nan has never made a card in her life and was so excited for me when I became a Stampin' Up! demo that she said she insisted that she wanted to try a card.  This is her attempt and she wanted me to apologise profusely to Amanda, so sorry Amanda! (she did try very hard)


Sunday, 3 January 2010

Puppies and handbags

As promised I have photo's of my beloved Radley handbag and the 2 gorgeous puppies that I spent Christmas with.  I apologise now for the length of this post and for the lack of craft!

I was so excited when I got my bag that I have to admit that I didn't really look at everything inside, look at what I found when I did!

There is a tote bag inside, approx 13x13 inches! Perfect for scrapbooks/ designer papers,12x12 cardstock. There was also this sweet little purse

Then, I found this little leather envelope.  Guess who was inside...???


And now for the aww factor.

This is Peroni.....


and Mango


They are cute but have way too much energy.

I will be back later to post todays "A Good Egg" card and the candle/card that my hostesses will be receiving in January.

Bye for now!
xx


Saturday, 2 January 2010

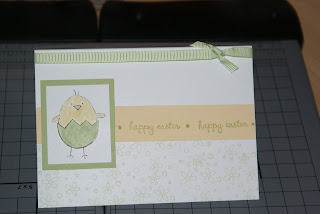
Easter Card

Okay, so I may be starting these a bit early but I got carried away with my new stamp set- "A Good Egg". It's so versatile and works really well with the colours in the Soft Subtles family.


 This card took approx 15-20 minutes to make and is one that I am going to be doing in my Easter class.  Although you can't see it in the picture, the bottom of the chick picture is actually 3D. I inked up just the shell part of the chick stamp, coloured it with a marker, then cut it out and attached using a dimensional.  If you wish to CASE it, feel free to contact me for instructions :)

Recipe
Card stock- Whisper White, Barely Banana, Certainly Celery
Ink-Black Staz-On, Certainly celery, Apricot Appeal.  Barely Banana and Certainly Celery Stampin' Write Markers from the Soft Subtles set
Stamps- A Good Egg- Chick, flower and sentiment
Ribbon- 1/4" Certainly Celery
Tools/adhesive- 1 dimensional, SNAIL tape pen, trimmer, scissors


How long ago..? Oops!

Honestly, I really didn't mean to leave it so long between blogs! I have been a busy bee though.  We have quite a few family birthdays in December, including mine, so we had family gatherings and pressies galore.  Unfortunately in between all the fun stuff we had holes in ceilings, collapsing floors, severed pipes,broken boilers and kidney stones!

We spent Christmas Day and Boxing Day at my aunties house, opening pressies, eating too much and playing with her 2 new Spinone pups (pics to follow!).  Oh, and for anyone who saw my facebook status about having found the perfect pressie before Christmas, it was something that my family agreed to buy for me.  It's green, it's lovely, it's a little on the huge side to hold all my junk - it's my new Radley handbag!!! (more pics to follow).

On the crafting front I have been creating a new website, holding my first workshop, planning clubs/classes and playing with my new stamps!  My "A Good Egg" set has just arrived and I'm amazed at how many non-Easter projects I have already used it for!  One of my New Year's resolutions is to be more organised so all being well I will have a post and new card to show you every day next week!  Fingers crossed for this resolution lasting longer than my usual 2 days of giving up chocolate!

I hope you all had a fantastic Christmas and New Year and that you have a fantastic 2010!

Bye for now
Helen xxx